Turn NeoVim into Lua IDE
- Turn NeoVim into Lua IDE
- Step 1. Installation
- Step 2. Detect Configuration Paths
- Step 3. Creating the init.lua File
- Step 4. Installing the Lazy Plugin Manager
- Step 5: Installing Language Server Protocol (LSP)
- Step 5 only for NevVim 0.11+
- Step 6: Code formatting with editor config
- Step 7. Useful options
- Step 8. Run the current buffer with Lua code in a single key
- Step 9: Install nvim-cmp and LuaSnip
- Step 10: Final setup
- Step 11. LuaSnip
- Step 12 (Optional): Invaluable Plugins for NeoVim
- Step 13 (Optional). jk ninja trick
- Step 14 (optional): nvim-treesitter
- Step 15 (Optional): StyLua as an alternative for Lua LSP formatting
- Step 16 (Optional): Telescope
- More Tips to Become a Vim/NeoVim Master
Last update: 2025-05-08
TL;DR;
Just copy contents from init.lua and paste into your init.lua file and run NeoVim.
NeoVim is a modern, Vim-based text editor with limitless customization possibilities. It is relatively lightweight and compatible with Vim, which has been beloved by IT professionals for decades.
In this guide, I will show how easy it is to set up NeoVim as an IDE for the Lua language. This guide primarily applies to Linux, but most of the features also apply to macOS and Microsoft Windows.
Step 1. Installation
First, let’s install NeoVim.
GNU/Linux Debian-based distributions (Ubuntu, Mint, etc.) can install NeoVim using the following command:
sudo apt-get install neovim
GNU/Linux DNF-based distributions (Fedora, CentOS, etc.) can install NeoVim using the following command:
sudo dnf install neovim
GNU/Linux Arch-based distributions (Manjaro, Arch Linux, etc.) can install NeoVim using the following command:
sudo pacman -S neovim
Homebrew on macOS or GNU/Linux
brew install neovim
You can find a detailed guide for your operating system.
Step 2. Detect Configuration Paths
The next step is to determine where NeoVim configuration files are stored. On Unix-like systems, they are usually stored in the $XDG_CONFIG_HOME environment variable.
To find your current configuration directory, run the following command inside NeoVim: :echo stdpath('config'). This will print the current configuration directory.
Typically, these are:
| OS | Config Directory | NeoVim Config Directory |
|---|---|---|
| Unix | ~/.config | ~/.config/nvim |
| Windows | ~/AppData/Local | ~/AppData/Local/nvim |
Read more about standard paths in the NeoVim documentation.
Step 3. Creating the init.lua File
Let’s start with an empty init.lua file in the config directory. We’ll assume you’re on Linux, so the full path will be ~/.config/nvim/init.lua. We can also define some variables here that might be useful later. Also added comments here to define init.lua file structure.
--init.lua

-------------------------------------------------------------------------------
-- locals
-------------------------------------------------------------------------------

local homedir = vim.fn.expand("$HOME")

-------------------------------------------------------------------------------
-- Lazy.nvim install
-------------------------------------------------------------------------------

-------------------------------------------------------------------------------
-- Vim options
-------------------------------------------------------------------------------

-------------------------------------------------------------------------------
-- Auto commands
-------------------------------------------------------------------------------

-------------------------------------------------------------------------------
-- Key mappings
-------------------------------------------------------------------------------

-------------------------------------------------------------------------------
-- Plugins
-------------------------------------------------------------------------------

-------------------------------------------------------------------------------
-- Load Lazy
-------------------------------------------------------------------------------

-------------------------------------------------------------------------------
-- Load LSP
-------------------------------------------------------------------------------

-------------------------------------------------------------------------------
-- Load nvim-cmp
-------------------------------------------------------------------------------
Step 4. Installing the Lazy Plugin Manager
NeoVim has an excellent plugin manager called Lazy, which is easy to install and use. You can follow the official installation guide, but this article covers the same approach.
Make sure to set up mapleader and maplocalleader before loading lazy.nvim to ensure that mappings work correctly.
This is also a good place to configure other settings using vim.opt.
After installation, paste the following code into your init.lua file:
-- init.lua

-------------------------------------------------------------------------------
-- locals
-------------------------------------------------------------------------------
-- ...

-------------------------------------------------------------------------------
-- Lazy.nvim install
-------------------------------------------------------------------------------
local lazypath = vim.fn.stdpath("data") .. "/lazy/lazy.nvim"
if not (vim.uv or vim.loop).fs_stat(lazypath) then
    local lazyrepo = "https://github.com/folke/lazy.nvim.git"
    local out = vim.fn.system({
        "git",
        "clone",
        "--filter=blob:none",
        "--branch=stable",
        lazyrepo,
        lazypath,
    })
    if vim.v.shell_error ~= 0 then
        vim.api.nvim_echo({
            { "Failed to clone lazy.nvim:\n", "ErrorMsg" },
            { out, "WarningMsg" },
            { "\nPress any key to exit..." },
        }, true, {})
        vim.fn.getchar()
        os.exit(1)
    end
end
vim.opt.rtp:prepend(lazypath)

-------------------------------------------------------------------------------
-- Vim options
-------------------------------------------------------------------------------
vim.g.mapleader = ","
vim.g.maplocalleader = "\\"

-------------------------------------------------------------------------------
-- Auto commands
-------------------------------------------------------------------------------

-------------------------------------------------------------------------------
-- Key mappings
-------------------------------------------------------------------------------

-------------------------------------------------------------------------------
-- Plugins
-------------------------------------------------------------------------------

-------------------------------------------------------------------------------
-- Load Lazy
-------------------------------------------------------------------------------
local plugins = require("config.plugins")
require("lazy").setup(plugins, {
    spec = {
        -- Import your plugins
        { import = "plugins" },
    },
    -- Configure any other settings here. See the documentation for more details.
    install = { colorscheme = { "habamax" } },
    checker = { enabled = true }, -- Automatically check for plugin updates
})

-------------------------------------------------------------------------------
-- Load LSP
-------------------------------------------------------------------------------

-------------------------------------------------------------------------------
-- Load nvim-cmp
-------------------------------------------------------------------------------

-------------------------------------------------------------------------------
-- Vim options
-------------------------------------------------------------------------------
-- ...
This is the initial setup for Lazy. After you run NeoVim, the Lazy plugin manager will install automatically.
Next, let’s create a plugins table that will be used in init.lua. Create an empty table—we’ll populate it later.
-- init.lua

-- ...

-------------------------------------------------------------------------------
-- Plugins
-------------------------------------------------------------------------------
local plugins = {}

-- ...
If you try to run nvim now, you will most likely see an error like this:
Error detected while processing ~/.config/nvim/init.lua:
No specs found for module "plugins"
Press ENTER or type command to continue
Don’t panic! This is expected because we haven’t installed any plugins yet. To check whether Lazy is installed correctly, type :Lazy and press Enter.
You should see a screen similar to the following:
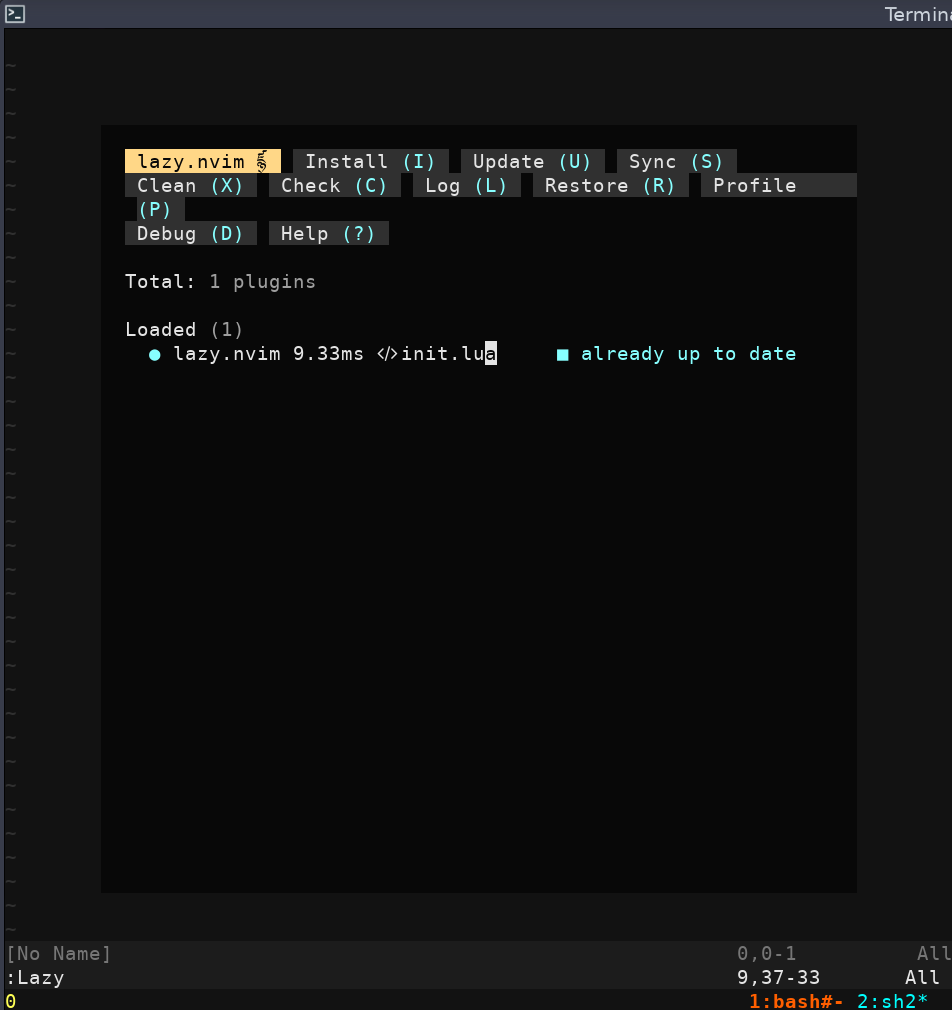
Tip: To quit the Lazy screen, press the
qkey.
The menu is quite straightforward:
- Install (I): Press Shift + I
- Update (U): Press Shift + U
- Help (?): Press ?
- And more. You can explore further by running
:Lazy help.
Alternatively, you can run the same commands from the NeoVim command line:
:Lazy install
:Lazy update
:Lazy help
Tip
It is recommended to run :checkhealth lazy after installation. Try to fix any reported errors and warnings.
Warning
After running Lazy plugin manager commands, a lazy-lock.json file will be automatically created in the configuration directory. Do not modify this file, as it is generated and updated automatically to store required metadata about plugins.
Step 5: Installing Language Server Protocol (LSP)
The Lua Language Server enhances Lua development by offering a range of features that streamline and speed up the coding process. It includes annotations and typing systems, autocompletion, linting, code formatting, and many other useful features.
There are two ways to install the LuaLS: compile it yourself or download a prebuilt binary for your platform. Compilation is outside the scope of this article. If you’re interested in the compilation process, refer to the official Lua LS documentation.
In this guide, we’ll use precompiled binaries. Download the latest release for your platform and unzip it into a directory such as ~/.config/lua-lsp.
Note: If you used a path other than
~/.config/lua-lsp, update the path accordingly in the following steps.
Next, we need to inform the operating system where to find the LSP binary. To do this, add the binary’s location to your $PATH environment variable. For Unix-like systems, add the following line to your .bashrc (or .zshrc, depending on your shell):
echo 'export PATH="$HOME/.config/lua-lsp/bin:$PATH"' >> ~/.bashrc
source ~/.bashrc
exec $SHELL
Your shell may be something other than bash. For example, on macOS, the default shell is zsh, so the configuration should go in .zshrc. Shell configuration depends on your platform and the shell you are using. Common configuration files in your home directory include: .bashrc, .bash_profile, .zshrc, .zsh_profile, etc.
To determine your current shell, run the following command in the terminal:
Tip
Your shell may be something other than bash. For example, on macOS, the default shell is zsh, so the configuration should go in .zshrc. Shell configuration depends on your platform and the shell you are using. Common configuration files in your home directory include: .bashrc, .bash_profile, .zshrc, .zsh_profile, etc. Type the command in terminal printenv SHELL to get your current shell.
Next, add neovim/nvim-lspconfig plugin to our plugins table. Which we have already created in Step 4.
--init.lua

-- ...

-------------------------------------------------------------------------------
-- Plugins
-------------------------------------------------------------------------------
local plugins = {
    "neovim/nvim-lspconfig"
}

-- ...
Now we need to initialize the LS setup. This should also be done in the init.lua file. Append the following lines:
--init.lua

-------------------------------------------------------------------------------
-- Load LSP
-------------------------------------------------------------------------------
require("lspconfig").lua_ls.setup({
    on_attach = function()
        -- add code if needed
    end,
    on_init = function(_client)
        -- add code if needed
    end,
})
Watch the demo of the LS in action. Notice that after typing table, pressing Ctrl + x followed by o triggers autocompletion.
Step 5 only for NevVim 0.11+
If you are using NeoVim 0.11+ there is built-in LSP and you have not mandatory to use nvim-lspconfig. Here is the full LSP configuration for NeoVim 0.11+
--init.lua

-------------------------------------------------------------------------------
-- Load LSP
-------------------------------------------------------------------------------
local capabilities = require("cmp_nvim_lsp").default_capabilities()
local lua_ls_config = {
    name = "lua_ls",
    cmd = { "lua-language-server" },
    root_dir = vim.fs.root(0, { "init.lua", ".git" }),
    capabilities = capabilities,

    settings = {
        Lua = {
            format = {
                enable = true,
            },
        },
    },

    on_attach = function(client, bufnr)
        -- format on save (real working solution)
        vim.api.nvim_create_autocmd("BufWritePre", {
            buffer = bufnr,
            callback = function()
                vim.lsp.buf.format()
            end,
        })
    end,
}

vim.api.nvim_create_autocmd("FileType", {
    pattern = "lua",
    callback = function(event)
        vim.lsp.start(lua_ls_config)
    end,
})
Step 6: Code formatting with editor config
You can use the embedded code formatter provided by Lua LS. Lua LS supports .editorconfig out-of-box; you can create a .editorconfig file globally in your $HOME directory. Or individually for each project or directory. LS will look up this file up to the directory tree.
Here is my preferred configuration, but you can set your personal preferences.
[*.lua]
indent_style=tab
indent_size=4
tab_width=4
quote_style=double
max_line_length=80
trailing_table_separator=smart
Setting up an auto command to run the formatter on save is also easy. Append the next lines to init.lua.
--init.lua

-- ...

-------------------------------------------------------------------------------
-- Auto commands
-------------------------------------------------------------------------------
vim.api.nvim_create_autocmd({ "FileType" }, {
    pattern = { "*.sh" },
    callback = function(args)
        vim.keymap.set("n", "<f5>", "<cmd>w<cr><cmd>!%%%<cr>")
    end,
})

-- ...
Step 7. Useful options
NeoVim and Vim have a huge number of preferences. Type :h options in the NeoVim command line to read documentation about options.
I would recommend using this setup, but you can change what you want. Lazy recommends setting up options before you initialize. Lazy
Make sure to setup
mapleaderandmaplocalleaderin step 4 loading lazy.nvim so that mappings are correct. This is also a good place to setup other settings (vim.opt)
--init.lua

-- ...

-------------------------------------------------------------------------------
-- Vim options
-------------------------------------------------------------------------------
vim.g.mapleader = ","
vim.g.maplocalleader = "\\"
vim.opt.exrc = false
vim.opt.secure = true
vim.opt.number = true
vim.opt.mouse = ""
vim.opt.spelllang = "en_us"
vim.opt.foldmethod = "indent"
vim.opt.foldlevel = 99
vim.opt.clipboard = "unnamedplus"
vim.opt.tabstop = 4
vim.opt.shiftwidth = 4
vim.opt.softtabstop = 4
vim.opt.expandtab = false
vim.opt.smartindent = true
vim.opt.list = true
vim.opt.ignorecase = true
vim.opt.infercase = true
vim.opt.smartcase = true
vim.opt.listchars = { tab = "⏵ ", trail = "." } -- , eol = "$"
vim.opt.rulerformat = "%l,%v"
vim.opt.colorcolumn = "75,79"
vim.opt.undofile = true
vim.opt.undodir = homedir .. "/.undodir"
vim.opt.lazyredraw = false
vim.opt.textwidth = 78
vim.opt.endoffile = true

-- ...
That is. This is a bare minimum to make your NeoVim the Lua IDE. Next steps are optional.
Step 8. Run the current buffer with Lua code in a single key
Usually I use the F5 key to run the file, but you can map it to any other key or sequence. To achieve this, add a key map in the Auto command section.
--init.lua

-- ...

-------------------------------------------------------------------------------
-- Auto commands
-------------------------------------------------------------------------------
vim.api.nvim_create_autocmd({ "FileType" }, {
    pattern = { "*.lua" },
    callback = function()
        vim.keymap.set("n", "<f5>", "<cmd>w<cr><cmd>!lua %<cr>")
    end,
})

-- ...
In the same manner, you can use the F6 for the debugger or something else.
Step 9: Install nvim-cmp and LuaSnip
nvim-cmp is a powerful completion engine plugin for neovim written in Lua. You can check the recommended documentation at nvim-cmp GitHub page.
--init.lua

-- ...

-------------------------------------------------------------------------------
-- Plugins
-------------------------------------------------------------------------------
local plugins = {
    -- ...
    "neovim/nvim-lspconfig",
    "hrsh7th/cmp-nvim-lsp",
    "hrsh7th/cmp-buffer",
    "hrsh7th/cmp-path",
    "hrsh7th/cmp-cmdline",
    "hrsh7th/nvim-cmp",
    -- ...
}

-------------------------------------------------------------------------------
-- Load Lazy
-------------------------------------------------------------------------------
-- ...

-------------------------------------------------------------------------------
-- Load LSP
-------------------------------------------------------------------------------
-- ...

-------------------------------------------------------------------------------
-- Load nvim-cmp
-------------------------------------------------------------------------------
vim.opt.completeopt = { "menu", "menuone", "noselect" }
local cmp = require("cmp")
cmp.setup({
    snippet = {
        -- REQUIRED - you must specify a snippet engine
        expand = function(args)
            require("luasnip").lsp_expand(args.body)
        end,
    },
    window = {
        -- completion = cmp.config.window.bordered(),
        -- documentation = cmp.config.window.bordered(),
    },
    mapping = cmp.mapping.preset.insert({
        ["<C-b>"] = cmp.mapping.scroll_docs(-4),
        ["<C-f>"] = cmp.mapping.scroll_docs(4),
        ["<C-Space>"] = cmp.mapping.complete(),
        ["<C-e>"] = cmp.mapping.abort(),
        ["<CR>"] = cmp.mapping.confirm({ select = true }),
    }),
    sources = cmp.config.sources({
        { name = "nvim_lsp" },
        { name = "luasnip" },
    }, {
        { name = "buffer" },
    }),
})

--- ...
Step 9B: Useful keystoker for nvim-cmp
nvim-cmp offers an incredible range of features, especially when paired with custom keystroke setups. By configuring specific keybindings, you can significantly enhance your workflow and streamline your interactions with code completion, snippet management, and language servers. This is my favorite setup, but you can set yours.
- Shift+K: opens popover with documentation and help;
- gd: “go to definition” e.g., if you place the cursor on a variable or function and use this keystroke, it will move the cursor where this variable, or method, or class is defined;
- <leader>dk: moves the cursor to the next error or warning reported by the language server;
- <leader>dj: moves the cursor to the previous error or warning reported by the language server;
- <leader>dl: opens all errors and warnings reported by the language server in Telescope popup window;
- <leader>r: renames the variable, method, or class;
- <leader>A: show language server’s actions;
vim.keymap.set("n", "K", "<cmd>lua vim.lsp.buf.hover()<cr>", { buffer = 0 })
vim.keymap.set("n", "gd", "<cmd>lua vim.lsp.buf.definition()<cr>",
    { buffer = 0 })
vim.keymap.set("n", "<leader>dk", "<cmd>lua vim.diagnostic.goto_next()<cr>")
vim.keymap.set("n", "<leader>dj", "<cmd>lua vim.diagnostic.goto_prev()<cr>")
vim.keymap.set("n", "<leader>dl", "<cmd>Telescope diagnostics<cr>")
vim.keymap.set("n", "<leader>r", "<cmd>lua vim.lsp.buf.rename()<cr>")
vim.keymap.set("n", "<leader>A", "<cmd>lua vim.lsp.buf.code.action()<cr>")
Step 10: Final setup
Finally, we can need to set capabilities for Lua LS; we use defaults. This is fine in most cases.
--init.lua

-- ...

-------------------------------------------------------------------------------
-- Load nvim-cmp
-------------------------------------------------------------------------------

--- ...

local capabilities = require("cmp_nvim_lsp").default_capabilities()
-- Add for each lsp server you've enabled.
require("lspconfig")["lua_ls"].setup {
    capabilities = capabilities,
}

--- ...
Step 11. LuaSnip
We install LuaSnip as a snippet engine, but you can use your favorite snippets engine: vsnip, snippy, etc.; these are mostly compatible with each other. How to set up LuaSnip check the LuaSnip GitHub project.
--init.lua

-- ...

-------------------------------------------------------------------------------
-- PLugins
-------------------------------------------------------------------------------
local plugins = {
    -- ...
    "L3MON4D3/LuaSnip",
    "saadparwaiz1/cmp_luasnip",
    -- ...
}

-------------------------------------------------------------------------------
-- Load nvim-cmp
-------------------------------------------------------------------------------

-- ...

-- Load LuaSnip
require("luasnip.loaders.from_snipmate").lazy_load()

-- ...
Step 12 (Optional): Invaluable Plugins for NeoVim
Some plugins might make your life even happier with NeoVim.
- tpope/vim-commentary: A very useful plugin to comment/uncomment with the gcc keystroke.
- tpope/vim-repeat: If you’ve ever tried using the
.command after a plugin mapping, you were likely disappointed to discover it only repeated the last native command inside that mapping, rather than the mapping as a whole. - tpope/vim-surround: This plugin is all about “surroundings”: parentheses, brackets, quotes, XML/HTML tags, and more. It provides mappings to easily delete, change, and add such surroundings
in pairs. - vim-airline/vim-airline: A cool custom status line.
- vim-airline/vim-airline-themes: A large set of themes for vim-airline.
- ctrlpvim/ctrlp.vim: Allows opening files with Ctrl+p keystrokes. I also recommend setting wildcards to ignore files, like:
vim.g.wildignore = "*/node_modules/*,*.so,*.swp,*.zip,*.git,*.o,*.a," - jiangmiao/auto-pairs: Automatically completes closing pairs:
",',(,[,{, etc. - flazz/vim-colorschemes: A large collection of color schemes for NeoVim. Use the
:color <tab>command to find your favorite color scheme. - nelstrom/vim-visual-star-search: Allows searching words with * in visual mode.
List of full plugins in the table:
--init.lua

-- ...

-------------------------------------------------------------------------------
-- PLugins
-------------------------------------------------------------------------------
local plugins = {
    -- ...
    "tpope/vim-commentary",
    "tpope/vim-surround",
    "tpope/vim-repeat",
    "vim-airline/vim-airline",
    "ctrlpvim/ctrlp.vim",
    "jiangmiao/auto-pairs",
    "nelstrom/vim-visual-star-search",
    "dhruvasagar/vim-table-mode",
    -- ...
}

-- ...
Step 13 (Optional). jk ninja trick
In NeoVim and Vim, by default, the key Esc is the default key to return to normal mode. The problem is that Esc key is too far from your main fingers. There is a ninja trick to map jk act as Esc . These small improvements greatly speed up coding.
--init.lua

-- ...

-------------------------------------------------------------------------------
-- Key mappings
-------------------------------------------------------------------------------
vim.keymap.set("i", "jk", "<Esc>")

-- ...
Step 14 (optional): nvim-treesitter
Shortly. Syntax highlighting on steroids. Treesitter and nvim-treesitter highlighting are an experimental feature of Neovim. Please consider the experience with this plug-in as experimental until Tree-Sitter support in Neovim is stable! We recommend using the nightly builds of Neovim if possible.
Add it to the plugins table:
--inia.lua

--  ...

-------------------------------------------------------------------------------
-- Plugins
-------------------------------------------------------------------------------
local plugins = {
    -- ...
    "nvim-treesitter/nvim-treesitter",
    -- ...
}

-- ...
To install parsers for TreeSitter: :TSInstall c lua vim vimdoc markdown
Step 15 (Optional): StyLua as an alternative for Lua LSP formatting
StyLua is an opinionated code formatter for Lua.
To install it on your platform, there are three ways:
- Use Rust:
cargo install stylua - Use NPM with Node.js®:
npm i -g @johnnymorganz/stylua-bin - Compile it yourself from the source code
Choose whichever method you prefer.
StyLua allows you to set up custom rules to fit your needs. Read the official documentation on configuration for more details.
If you want to configure StyLua per project, you can create a .stylua.toml file in the project root or check out my article dedicated to Stylua.
Another useful feature is auto-formatting files upon saving. For this purpose, we can create an autocommand in NeoVim. Edit your init.lua as follows:
--init.lua

-- ...

-------------------------------------------------------------------------------
-- Auto commands
-------------------------------------------------------------------------------
-- ...
vim.api.nvim_create_autocmd({ "BufWritePost" }, {
    pattern = { "*.lua" },
    callback = function()
        local stylua_cmd = "silent! !stylua --column-width=78 %"
        vim.cmd([[silent! %s/\s\+$//e]])
        vim.cmd(stylua_cmd)
    end,
})

-- ...
Step 16 (Optional): Telescope
telescope.nvim is a highly extendable fuzzy finder over lists. Built on the latest awesome features from neovim core. Telescope is centered around modularity, allowing for easy customization. It is straightforward to use and install, referer to its documentation, add to the plugins table and most of the features works out-of-box.
--init.lua

-- ...

-------------------------------------------------------------------------------
-- Plugins
-------------------------------------------------------------------------------
local plugins = {
    -- ...
    "nvim-telescope/telescope.nvim",
    -- ...
}

-- ...
You can download init.lua file with all settings.
More Tips to Become a Vim/NeoVim Master
- From time to time, review your configuration and adjust it to fit your needs.
- Train your fingers daily to build muscle memory for keystrokes and learn new shortcuts.
- In the beginning, you might be slow with Vim/NeoVim. Do not give up; it takes time to understand the wisdom of the masters.
- Read the book Practical Vim.
- Use
:h <topic>the command to learn and get help; - There are limitless possibilities to customize NeoVim to match your needs and habits.
- If you’re struggling, you can check my
init.luaas a starting point for your setup or inspiration.
That’s all! Happy Vim-ing!